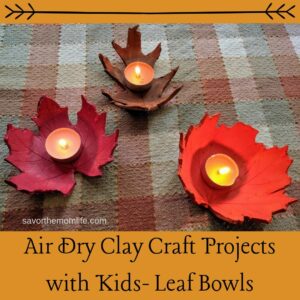
Air Dry Clay Craft Projects with Kids- Leaf Bowls
Recently I was at the craft store getting some supplies for my sister’s baby shower. I don’t go often because there is always a sale and always something I want. It is very hard not to impulse buy in those places for a crafty mamma like me. This time I grabbed a big box of Air Dry Clay. I have always wanted to try it out. No baking or mixing, just mold, leave to dry, and paint. I was very excited to try it out with the kids. Fall is my favorite season and since we are quickly approaching that time we decided to make some leaf print bowls with the clay. It is one of my favorite air dry clay projects with kids.

I have been or can be if you click on a link and make a purchase, compensated via a cash payment, gift, or something else of value for writing this post. Regardless, I only recommend products or services I use personally and believe will be good for my readers. Please read my full disclosure for more information.

Project Supplies
- Messy table or mat- it is very sticky and the corn starch will be everywhere!
- Corn Starch- The Fresh Clay is very sticky when right out of the box. A sprinkle of corn starch will keep the clay from sticking to everything.
- Air Dry Clay- Amaco White or Gray.

- Clay sculpting tools- rolling pin, cutting and shaping knife, cookie cutters. Just remember the clay is super sticky so anything with small holes will get clay in and it will be very hard to get it out. I just dug out some oldie but goodies from the play dough drawer!
- Drying area. Once done sculpting everything will need to sit undisturbed for one or two days for drying. I used some plastic bowls for my leaves to dry into a bowl-like shape.
- Water cup. If you are sticking two pieces of clay together after working it into shape, a drop of water or two will make it stick nicely. You can use more drops and your fingers to smooth out the seems.
- Paint and Modge Podge. This will make your final product beautiful and a tiny bit more sturdy.

Tips for Working with the Clay
- As previously stated the clay will be very sticky when first opened. Sprinkle some corn starch on the table, your hands, and tools to help it not stick to everything, not too little and not too much because then the clay won’t stick to itself as you need. Start with a tablespoon and add more as needed. I also have seen some work with the clay on parchment or wax paper. Sure, it won’t stick to that but it’s hard to work with even for adults- let alone kids. Besides they want to get messy anyway!
- The clay will need to be worked to create a smoothness in whatever you are crafting. Use the heat and movement from your hands to warm and soften.
- Don’t forget to add some cornstarch to the tools. Some non-stick cooking spray might do the trick on some of the tools with deeper grooves.
- If the clay starts getting dry or hard to stick and mold you can add a tiny bit of water to help moisten or stick to itself. Remember, a little bit goes a long way. Too much water and you will have a sticky runny mess.
- This clay shrinks or contracts when it dries. Try to take that into account when you are crafting. If molding around something It won’t work well to leave it around the mold. Also, some joints may come apart while drying. I found that super glue can fix this once dry. When you are crafting the leaf bowls be sure to make the thickness at least 1/8 of an inch or more. I was trying to conserve clay and go thinner. The first batch I crafted did not make it. One cracked completely in half while drying and the other while I was trying to paint.
Steps for Crafting the Leaf Imprint Bowls
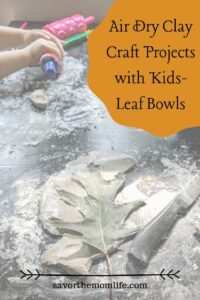
- Take a fist full of clay and roll out with some corn starch to keep from sticking. Remember to keep it 1/8 inch or thicker.
- Choose a leave to press into the clay. Green, fresh leaves work best because they don’t crumble with pressure and use.
- Roll or gently press the leaf into the clay.
- Carefully cut around the leaf outline with a knife or kid-friendly dough tool. Leaving the leaf on the clay while you cut.
- Keeping the leaf on the clay carefully lift from the table- using the knife to slowly pull up.
- Place the molded leaf into a bowl. This way as it is drying it will for to a bowl-like shape. Take the leaf off the clay after you have it positioned in the bowl to your liking.
- Wait one-two days for the clay to dry.
- PAINT and Enjoy.

My kids are 4 and 6. They are not able to do all these steps on their own but enjoyed assisting me. They both loved making their own creations while I was working with the leaves as well.
Here are some of the creations my kids have crafted with the air-dry clay.
- Ice Cream and Cone.
- Golden Snitch
- Mini Cauldron (Fail)
- Fake Rocks (hahaha)
- Snowmen
- Cookies
- Pinch Pot Bowls and Cups
- Pasquale (From Tangled, and yes this was done by me but requested by Lily)

If you loved this project you should get some Air Dry Clay and try it yourself!!! Get some here from Amazon!
Please subscribe to my blog for a biweekly email. I will be sending mom inspiration, gratitude challenges, and cool kid crafts just like this one. Sign up from this blog and get my Air-Dry Clay Idea Master List!!
Check out my other Fall Craft- Painting with Apples


You May Also Like
35 Fun Ways to Teach the Alphabet to Little Kids
DIY Snowflake Cork Stamp