Crafty Cupid Unleashed: Yarn-Inspired Valentine’s Day Fun for Kids
As Valentine’s Day approaches, there’s no better way to celebrate the season of love than by creating heartfelt and personalized Valentines with your little ones. This year, why not embark on a creative journey with your kids and add a touch of warmth to your expressions of love? In this blog post, we’ll explore the fun world of yarn crafts and help you make delightful homemade Valentines that are as warm and fun as your sweet kiddos. Yarn, with its vibrant colors and tactile appeal, is the perfect medium for kids to express their creativity. Crafty Cupid Unleashed: Yarn-Inspired Valentine’s Day Fun for Kids.
Homemade Valentines allow your children to infuse their personality into each creation. Whether it’s choosing their favorite colors, adding unique embellishments, or simply sharing a handwritten message, these projects become more than just cards—they become tokens of love that reflect the individuality of each child.
If you are interested in trying out some fun Valentine’s Learning Activities with your kiddos, try out the Valentine’s Busy Box Blog! or these adorable hand and footprint valentines!
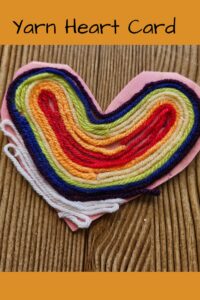
Yarn Heart Cards
Cut out heart-shaped cards from construction paper. Use glue to create a heart shape on the card, and then wrap yarn around it, filling the heart with colorful yarn patterns. Kids can also add additional decorations like small paper flowers or stickers.
Materials Needed:
- Construction paper (various colors)
- Scissors
- Glue
- Yarn (assorted colors)
- Small paper flowers or stickers (optional)
Instructions:
- Cut Heart-Shaped Cards:
- Begin by cutting out heart-shaped cards from construction paper. You can choose different colors for variety or let the kids express their preferences.
- Create a Heart Shape:
- Use glue to draw a heart shape on the front of each card. The kids can either follow a template or freehand their hearts, allowing for creativity and uniqueness in each design.
- Wrap Yarn Around the Heart:
- Once the glue heart is created, show the kids how to start wrapping yarn around it. Begin by securing one end of the yarn with a small dab of glue in the center of the heart. Then, let them wrap the yarn around the heart, crisscrossing or creating patterns as they go. Encourage them to experiment with different color combinations for a vibrant effect.
- Fill the Heart with Colorful Patterns:
- Continue wrapping the yarn until the entire heart is filled, leaving no gaps. The goal is to create a beautiful and textured yarn pattern within the heart shape. The kids can adjust the tension of the yarn to control the density of the pattern.
- Secure the End:
- Once the heart is filled with yarn, secure the loose end by gluing it down. Ensure that the yarn is firmly attached to prevent unraveling.
- Add Additional Decorations:
- To enhance the visual appeal, let the kids get creative by adding small paper flowers, stickers, or other decorative elements around the yarn heart. This step allows for personalization and gives each card a unique touch.
- Write a Heartfelt Message:
- Inside each yarn heart card, encourage the children to write a heartfelt message or draw additional doodles. This personal touch adds warmth and love to the final creation.
- Share Your Yarn Heart Cards:
- These yarn heart cards are not only a joy to make but also make wonderful Valentine’s Day gifts. Whether shared with friends, family, or classmates, the recipients are sure to appreciate the effort and thought put into these handmade expressions of love.
Yarn-Wrapped Love Bugs
Create small pom-poms using yarn or use store-bought ones. Attach googly eyes and small heart-shaped cutouts as wings. Wrap colorful yarn around the pom-pom to give the love bug a cozy and vibrant appearance.

Materials Needed:
- Yarn (various colors)
- Scissors
- Small pom-poms (homemade or store-bought)
- Googly eyes
- Colored paper or foam sheets
- Glue
- Pipe cleaners (optional, for antennae)
Instructions:
- Create Small Pom-Poms:
- Begin by creating small pom-poms using yarn. You can use a pom-pom maker or follow a simple method of wrapping yarn around your fingers and tying it tightly in the middle. Alternatively, store-bought pom-poms work perfectly well for this craft.
- Attach Googly Eyes:
- Once you have your pom-poms ready, attach googly eyes to each one using glue. The eyes will bring your love bugs to life, giving them an adorable and playful appearance.
- Add Heart-Shaped Wings:
- Cut small heart shapes from colored paper or foam sheets to create wings for your love bugs. Attach these heart-shaped wings to the pom-poms using glue. Experiment with different colors and sizes to add variety to your love bug collection.
- Wrap Yarn Around the Pom-Pom:
- Now comes the fun part! Encourage the kids to wrap colorful yarn around the pom-pom, creating a cozy and vibrant exterior for their love bugs. They can experiment with different wrapping patterns, mix multiple yarn colors, or even add contrasting stripes for a whimsical touch.
- Secure Yarn Ends:
- Once the pom-pom is completely wrapped, secure the loose ends by gluing them discreetly to the pom-pom. This ensures that the yarn stays in place and gives a neat finish to the love bug’s appearance.
- Optional: Add Antennae:
- For an extra touch, cut small pieces of pipe cleaner and attach them to the top of the pom-pom as antennae. Twist the pipe cleaner pieces to add a playful element to your love bugs.
- Create a Love Bug Family:
- Repeat the process to create a whole family of yarn-wrapped love bugs. Each bug can have its own unique color combination and personality, making this craft both enjoyable and customizable.
- Share the Love Bugs:
- These adorable yarn-wrapped love bugs make for charming Valentine’s Day gifts or decorations. Whether displayed on a tabletop or given as a heartfelt token to friends and family, these love bugs are sure to spread joy and warmth.
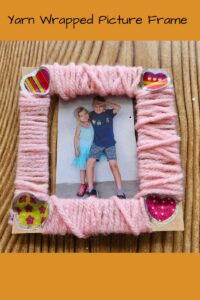
Yarn-Wrapped Photo Frames
Cut out a heart-shaped frame from cardboard or use a pre-made one. Have kids wrap yarn around the frame, adding their unique patterns and designs. Insert a small photo in the center and voilà! A personalized photo frame.
Materials Needed:
- Cardboard or pre-made heart-shaped photo frames
- Yarn (various colors)
- Scissors
- Glue
- Small photos (trimmed to fit the frame)
- Decorative elements (optional, like buttons, beads, or small ornaments)
Instructions:
- Prepare the Heart-Shaped Frame:
- Begin by cutting out a heart-shaped frame from cardboard or use a pre-made one if available. Ensure that the frame is sized appropriately to showcase the small photos.
- Choose a Variety of Yarn Colors:
- Provide kids with an assortment of yarn colors. Encourage them to pick colors that complement each other or align with their personal preferences. The variety of colors will add vibrancy to the frames.
- Start Wrapping Yarn:
- Demonstrate to the kids how to start wrapping yarn around the heart-shaped frame. They can experiment with different wrapping techniques, such as crisscrossing, spiraling, or creating patterns. This step allows for creativity, and each frame can be unique.
- Add Decorative Elements (Optional):
- For an extra touch of personalization, provide small decorative elements like buttons, beads, or tiny ornaments. Kids can glue these elements onto the yarn as they wrap, adding texture and visual interest to their frames.
- Secure Yarn Ends:
- Once the frame is entirely wrapped with yarn, secure the loose ends by gluing them to the back of the frame. Make sure the yarn is securely attached to prevent unraveling.
- Trim Photos to Fit:
- Trim small photos to fit the center of the heart-shaped frame. The photos can feature friends, family, or beloved pets. Ensure that the images are small enough to fit comfortably within the heart-shaped opening.
- Insert Photos and Final Touches:
- Carefully insert the trimmed photos into the center of each frame. The heart-shaped yarn-wrapped border will beautifully frame the pictures. If desired, kids can add any final touches, like a small message or additional decorative elements.
- Create a Display:
- The yarn-wrapped photo frames can be displayed individually or grouped to create a charming gallery of personalized masterpieces. They make for lovely gifts for parents, grandparents, or friends, showcasing not only the captured memories but also the creativity of the young artists.
- Share the Love:
- These yarn-wrapped photo frames are not just crafts; they become cherished keepsakes. Share the love by gifting them to special people in your life or proudly displaying them as a delightful addition to your home decor.
Yarn-Wrapped Flowers
Cut out flower shapes from cardboard or thick paper. Kids can then wrap different colored yarn around each flower petal to create a vibrant bouquet. Flowers are a Valentine’s Day Staple! How fun to make some that can last forever.

Materials Needed:
- Cardboard or thick paper
- Various colors of yarn
- Scissors
- Glue
- Green pipe cleaners
- Pencil (optional, for shaping petals)
Instructions:
- Prepare Flower Shapes:
- Begin by cutting out flower shapes from cardboard or thick paper. You can go for classic flowers like daisies or tulips, or let the kids get creative and design their floral shapes.
- Choose Vibrant Yarn Colors:
- Offer a selection of different colored yarn to the kids. Encourage them to mix and match colors to create a vibrant and eye-catching bouquet. This is a great opportunity for them to explore their color preferences and combinations.
- Start Wrapping:
- Show the kids how to start wrapping the yarn around each petal of the cardboard flower. They can experiment with different wrapping techniques, such as crisscrossing or creating patterns, to add texture and visual interest.
- Secure Yarn Ends:
- Once a petal is completely wrapped, secure the yarn by gluing the ends to the back of the cardboard. Make sure to supervise younger children during this step to avoid any mishaps with glue.
- Shape Petals (Optional):
- For an extra touch, use a pencil or your fingers to gently shape the yarn-wrapped petals, giving the flowers a more realistic and three-dimensional appearance.
- Create Stems:
- To complete the yarn-wrapped flowers, glue a green pipe cleaner to the back of each flower. The pipe cleaner serves as the stem and allows for flexibility in arranging the flowers into a bouquet.
- Arrange Your Bouquet:
- Let the kids have fun arranging their yarn-wrapped flowers into a beautiful bouquet. They can create a single large flower or a cluster of smaller ones, showcasing their unique artistic vision.
- Personalize and Gift:
- Encourage the children to add any extra details they like, such as small heart-shaped leaves or personalized messages. Once their yarn-wrapped flowers are complete, these handmade creations make for delightful and heartfelt Valentine’s Day gifts for friends, family, or teachers.
Yarn-Twisted Bracelets:
Let the kids choose the colors. Twist the yarn together. The yarn will twist up on itself. Leaving one end with a loop. Bonus: add small heart-shaped beads or charms for an extra touch. Make sure to add the beads before twisting!

Materials Needed:
- Yarn (various colors, 3 strands of about 18 inches each)
- Scissors
- Tape
- Table or flat surface
- Small heart-shaped beads or charms (optional)
Instructions:
- Choose Yarn Colors:
- Begin by letting the kids choose three colors of yarn. Encourage them to pick colors that they love or that have special meaning to them. This adds a personal touch to their twisted yarn bracelets.
- Cut Yarn Strands:
- Cut three lengths of yarn, each about 18 inches long. Ensure that the lengths are equal. The colors can be mixed and matched according to the kids’ preferences.
- Secure Yarn to Table:
- Tie the three strands of yarn together at one end, creating a knot. Tape this knotted end to a table or flat surface. This will provide stability and make it easier for the kids to twist the yarn.
- Twist the Yarn:
- Have the kids grab the free ends of the yarn and start twisting them together. Encourage them to twist in one direction until the entire length is tightly twisted. This step is not only fun but also helps in creating the unique pattern of the bracelet.
- Fold the Twisted Yarn:
- With the yarn still twisted, instruct the kids to put their fingers in the middle of the twisted length and fold the bottom up to the top. As they fold, the yarn will naturally twist up on itself, forming a twisted bracelet.
- Create a Loop:
- Once the yarn is twisted and folded, there will be one end with a loop. Instruct the kids to tie a small knot on top of the first knot, using both ends. This knot will create a loop for closing the bracelet.
- Add Beads for Extra Charm (Optional):
- For an extra touch of charm, provide small heart-shaped beads or charms. Before twisting the yarn, kids can thread these beads onto the yarn strands. The beads will add a lovely decorative element to the finished bracelet.
- Final Adjustments:
- Ensure that the knot is securely tied, and the loop is large enough for easy closure. Kids can trim any excess yarn if needed.
- Wear and Share:
- The twisted yarn bracelets are now ready to be worn with pride! Kids can wear them themselves or share them with friends and family as sweet and handmade tokens of affection. The added beads provide a touch of uniqueness to each bracelet, making them not just accessories but cherished keepsakes.
In the delightful world of crafting, making yarn Valentine’s Day crafts with kids is a heartwarming and joyous experience.
From charming yarn-wrapped photo frames that encapsulate cherished memories to whimsical twisted yarn bracelets infused with personal flair, each project is an opportunity for creativity and bonding. The yarn heart cards, yarn-wrapped flowers, and yarn-wrapped love bugs bring an enchanting touch to heartfelt gestures. As young hands explore the vibrant threads, the crafting process becomes a celebration of love, imagination, and the joy of sharing handmade expressions with those dear to our hearts. These crafted treasures not only serve as thoughtful Valentine’s Day gifts but also stand as tangible tokens of the unique connections forged through the art of making.
Want some more Valentine’s Day FUN?! Check out all my Early Learning Games on YouTube.
You May Also Like
Dear Moms on Your Very First Day of School
How to Rotate and Organize Toys to Promote Intentional Play